


Week 10: Music Player, and Serial Communication of Rotation to Unity
SPI and I2C

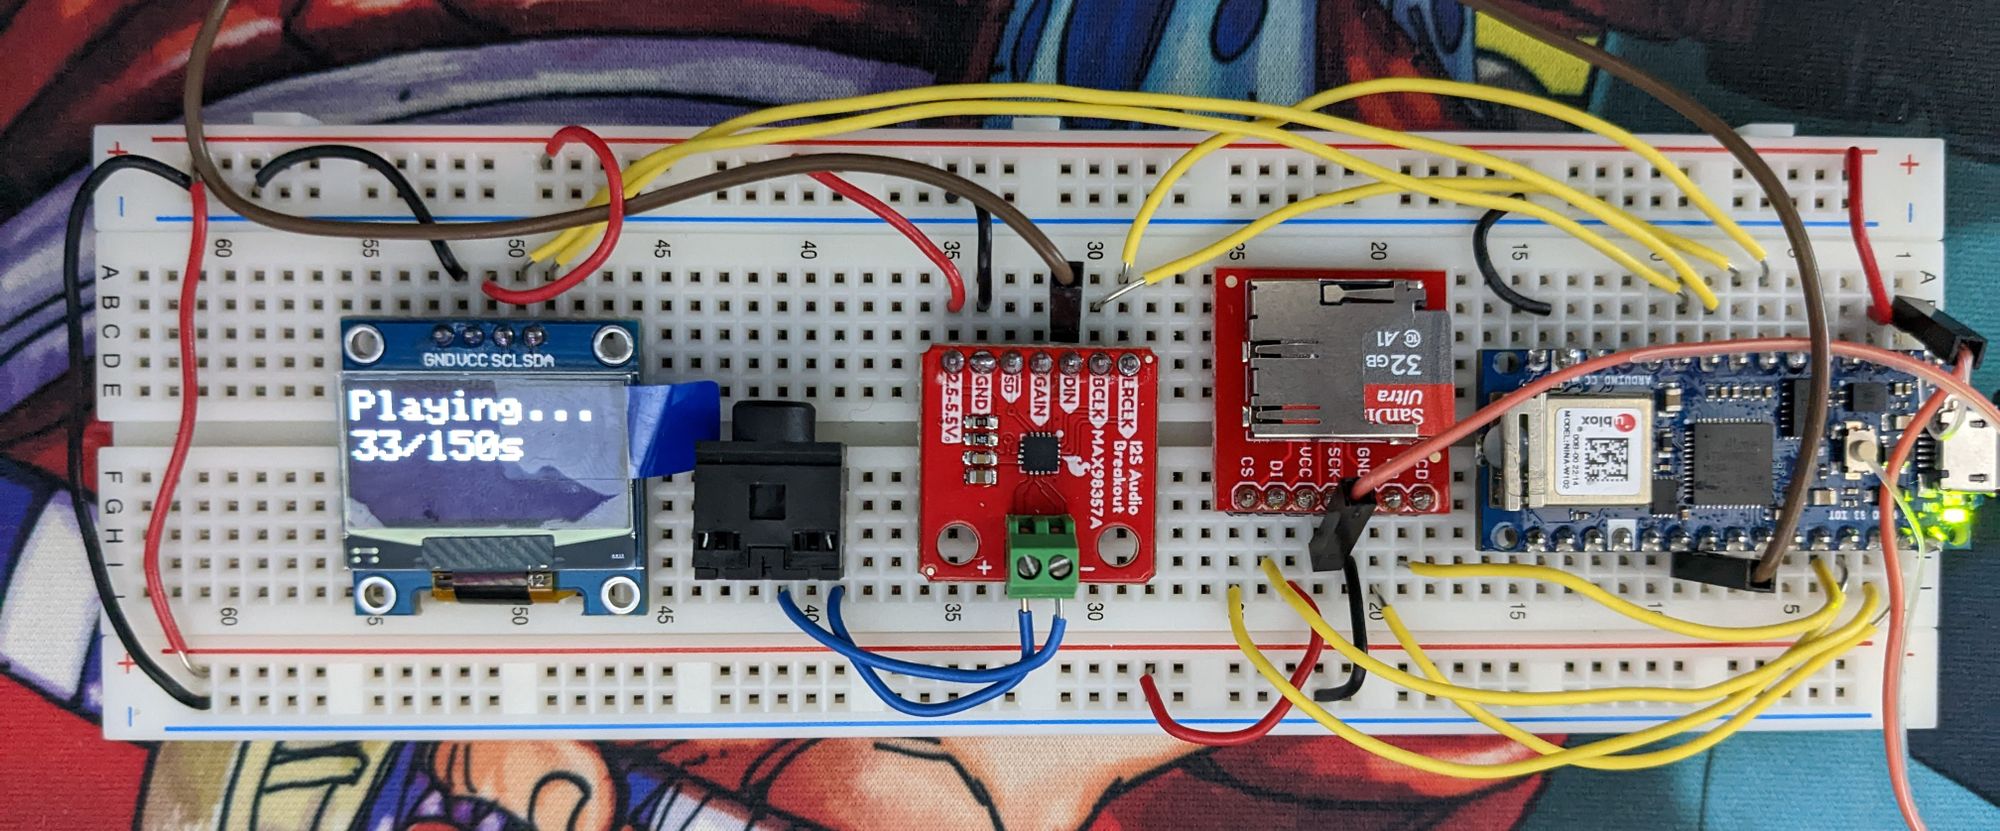
Last week I had some trouble reading the SD card, but I managed to work it out by exactly following the schematic diagram in the Data Logging lab, which shows all of the SD card breakout board's pin connections. The .WAV lab shows a circuit diagram that doesn't include the CD (card detect) connection. The lab says it's optional, so it doesn't seem to be the cause for my earlier trouble. Looking back at the first version of my circuit, it looks like I simply counted the microcontroller's pins incorrectly – I thought D13, which is the microcontroller's SCLK, was on top right side when in fact it's the top left. I referred to the MC pin functions lesson often – I feel like I should just keep a printout with my breadboard.
After getting the SD card to read and confirming that the file will play, I wanted to display the track's time using the OLED display. I essentially copied the code from the OLED lab, modifying it to display the time elapsed since beginning the track.
#include <SD.h>
#include <SPI.h>
#include <ArduinoSound.h>
#include <Wire.h>
#include <Adafruit_SSD1306.h>
#include <Adafruit_GFX.h>
#define I2S_DEVICE 1

const int SCREEN_WIDTH = 128;
const int SCREEN_HEIGHT = 64;
const int chipSelect = 10;
const int cardDetect = 9;
// filename of wave file to play
// file name must be 8 chars (max) .3 chars
const char filename[] = "fe.wav";

SDWaveFile waveFile;
long lastPrintTime = 0;

Adafruit_SSD1306 display(SCREEN_WIDTH, SCREEN_HEIGHT);

void setup() {
  Serial.begin(9600);
  while (!Serial)
    ;

  int ledState = HIGH;
  pinMode(LED_BUILTIN, OUTPUT);
  pinMode(cardDetect, INPUT);

  // if the card is not present or cannot be initialized:
  while (!SD.begin(chipSelect)) {
    // toggle LED every 1/4 second while the SD card's not responding:
    digitalWrite(LED_BUILTIN, ledState);
    ledState = !ledState;
    delay(250);
  }
  // turn the LED off when SD card is responding:
  digitalWrite(LED_BUILTIN, LOW);

  if (!display.begin(SSD1306_SWITCHCAPVCC, 0x3C)) {
    Serial.println("Display setup failed");
    while (true);
  }
  Serial.println("Display is good to go");

  waveFile = SDWaveFile(filename);
  if (!waveFile) {
    Serial.print("There is no .wav file called ");
    Serial.println(filename);
    while (true);
  }

  // print the file's duration to monitor:
  long duration = waveFile.duration();
  Serial.print("Duration = ");
  Serial.print(duration);
  Serial.println(" seconds");

  if (!AudioOutI2S.canPlay(waveFile)) {
    Serial.println("unable to play wave file using I2S");
    while (true);
  }

  // set the playback volume:
  AudioOutI2S.volume(80);
  // start playback
  Serial.println("playing file");
  AudioOutI2S.play(waveFile);

  // clear the display:
  display.clearDisplay();
  // set the text size to 2:
  display.setTextSize(2);
  // set the text color to white:
  display.setTextColor(SSD1306_WHITE);
}

void loop() {

  if (millis() - lastPrintTime > 1000) {
    display.clearDisplay();
    display.setCursor(0, 0);

    if (!AudioOutI2S.isPlaying()) {
      display.print("Stopped");
      while (true);
    } else if (AudioOutI2S.isPaused()) {
      display.print("Paused");
    } else {
      display.print("Playing...");
      display.setCursor(0, 20);
      display.print(waveFile.currentTime() + 1);
      display.print("/");
      display.print(waveFile.duration());
      display.print("s");
    }
    lastPrintTime = millis();
    display.display();
  }
}
Since I wanted to spend more time learning about Bluetooth and the gyrometer this week (which I discuss below), I decided not to work on this code any further, but I'd like to try making a music player in the future. Some issues and ideas I'd like to address:
- I don't think the first conditional in the loop makes a distinction between a file that has paused and a file that has stopped, since "paused" is also "not playing."
- On that note, I haven't implemented a way to pause and restart the track. I'd also like the option of replaying the track when it has finished.
- I decided not to add or edit fonts, but the display is cramped as is and wouldn't be able to fit all of a track's information in the 128x64 display. If I were to create an actual music player, I'd like to be able to navigate through songs and see their titles while listening to them, in addition to their length and how much I've listened so far.
Gyrometer and Unity
I followed the Serial IMU Output lab to learn how to output information from the Arduino's gyrometer in a readable way, and used this resource on the SerialPort class in C# to send that information to Unity. As a test, I'm using the yaw, pitch, and roll of the Arduino to change the orientation of a virtual rod in Unity. A few observations:
- My interpretation of the angles (0, 0, 0) does not correspond to the Arduino's angles (0, 0, 0). Since I'm trying to orient a vertical rod, my instinct was to start by holding the Arduino vertically. But the Arduino's heading or yaw is measured top-down. I think I could correct this discrepancy by offsetting the angles retrieved from the Arduino, but this is only an issue if the user is trying to match the orientation of something on screen to the Arduino. In other words, maybe it doesn't matter for the purposes of our guessing game.
- The heading/yaw slowly decreases over time – the lab mentions that it could be adjusted using a magnetometer. While an imperfect measurement of angle is fine, especially given the nature of our game, I wouldn't want the user to think that the "correct" orientation is changing over time.
I added a few new features to the prototype to make it more playable, and closer to what we described in class. First, I timed the "measurement" action to take place every 5 seconds so that the user is pressured to get the right position in time. We might want to add a button to start and end the game, and timer for some additional pressure. Second, I used some cat graphics to test the idea of the cat reacting to our motions – we might try to make a cat that animates with the angle instead of reacting at threshold levels. While testing the game, I realized that I'm never still for so long that the change in heading matters.
We'll consider wrapping the circuit or attaching something to make it look like a cat toy, like a ball of yarn or a mouse attached to a string. I'm considering these options more seriously now because it seems like it might be difficult using Bluetooth with Unity – or at least, it's not the same as serial. While using Bluetooth would allow more freedom in terms of how the user interacts with the "Bloch sphere", it would also mean including a power supply in our design. Rather than debugging the Bluetooth features, I'd rather improve on what we already know, and consider how we'll start including the educational aspects of the project.